


How to Test the Interlock SwitchThe interlock switch prevents various components from functioning when the door is open. For example, an automatic ice through the door dispenser should not operate when the door is open. If it did, the ice would spill onto the floor. If this switch malfunctions, it can cause improper function by either disabling features or failing to safeguard against their use when the door is open. The switch may be shared with the door's light switch, but more often it has its own separate switch. The switch may be mounted near the light switch or it may be on the door itself, possibly near the bottom, out of view. Caution: Please read our safety information before attempting any testing or repairs.
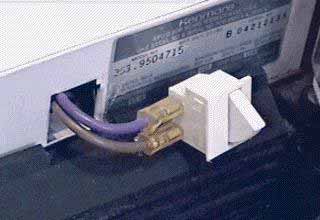
Locate the switch and remove it by removing the retaining screw (if any) or by prying it with a putty knife. Place a piece of masking tape over the blade of the putty knife to prevent damage to the freezer. Gently pull the switch from its housing and expose an inch or two of wire. The switch will be connected by two wires (four wires if it also controls the light). Label the wire placement on the switch before disconnecting the wires. The wires are connected to the switch with slip on connectors. Firmly pull the connector off of the switch terminal (do not pull on the wire). You may need to use a pair of needle-nose pliers to remove the connectors. Inspect the connectors and the terminals for corrosion. If the connectors are corroded they should be replaced.
Page 1 of 2 |
 |
|