How To Replace a Toilet
Continued from page 2
Removing the bowl is the next step. The toilet bowl is held in place primary by gravity and two small bolts. Snap open the bolt covers on either side of the bowl. Use a wrench or pliers to remove the nut from each bolt. Some installations use caulking between the foot of the bowl and the floor. Use a razor knife to cut through any caulking before attempting to lift the bowl. Also, before removing the bowl, have a place prepared to set it down. The heavy bowl can scratch floors, will spill some water and will have a sticky wax gasket underneath. A sheet of cardboard or a heavy towel (that may become ruined) will work well. Carefully lift the bowl straight up until it clears the bolts and move it out of the way.
Take a large rag, towel or wad of newspaper and stuff it into the drain in the floor. Make sure whatever you use is large enough that it won't be lost down the drain. Sealing the drain will help keep sewer gas from entering the room and also to prevent tools and parts being dropped down the drain.
The toilet flange in the floor has two bolts protruding upward from it. The bolts can be slid over and lifted out. They should be thrown away. Use a putty knife or similar tool to scrape away all the old wax from the flange. If there is any putty or caulking on the floor, remove that now also. If any stains will be visible after the new toilet bowl is installed, it is easier to clean them now.
 |
Most wax seals come with a new set of toilet flange bolts. If your wax seal does not include flange bolts, purchase a new set of bolts: do not reuse the old ones. Slide the head of each bolt into the toilet flange on the floor and position them so that they are both the same distance from the back wall. If the bolts will not stand up straight, use a pinch of wax from the old seal to help hold them in place.
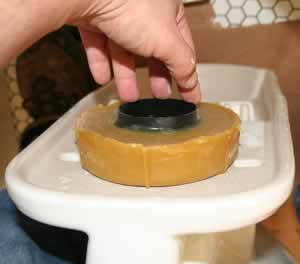
On the under side of the toilet bowl is the outlet horn. The horn lines up with the toilet flange in the floor. In order to make a tight seal between the horn and the flange, a wax seal is installed between them. There are two types of wax seals, those with a plastic sleeve and those without. Use whichever kind was used on the old toilet. Press the wax side of the seal firmly against the the toilet, around the outlet horn. The sleeve, if any, will slip into the drain opening in the floor.
At this point, there is a difference of opinion among professional installers. Some will use a plumber's putty around the foot of the bowl to create a seal betwen the floor and the bowl. This has the benefit protecting the floor and the bowl surfaces from being marred. It is also an additional seal against sewer gas or water leaking out. Finally, it creates a more aesthetically pleasing seal of gaps around the bottom of the toilet. However, some people prefer to use tub and tile caulk around the footprint of the toilet, after it is installed. Still others prefer to use nothing, because if there is a break in the wax seal or water is leaking under the toilet, you should want to know about it so that the problem can be corrected. Your manufacturer's instructions or local building code may dictate what option is used and should be your guide.
Page 3 of 5
| Previous Page |


