


How To Replace the Holding SwitchThere are two types of ice makers, those in which all of the parts can be individually replaced and those in which some of the parts are clustered together into a control module. To determine which model you have remove the outer face plate. If there is knob, pull it off first, then pry off the face plate with a small screwdriver. Caution: Please read our safety information before attempting any testing or repairs.
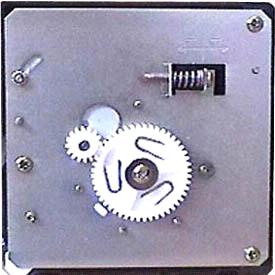
Modular units have holes in the module's face plate for test probes. If you see several holes, each marked with a letter, it is a modular unit, refer to the section: control module for replacement instructions. Component units (like the one shown below) usually have exposed gears and don't have holes for testing.
Component Ice MakerIt is easier to work on this type of unit by first removing the entire ice maker from the freezer compartment. The unit is usually mounted to the freezer case by two or more screws. Remove the bottom screws first. While supporting the ice maker, remove the remaining top screws. Unplug the ice maker from the freezer cabinet if you have not already done so. Along the edge nearest the shutoff arm, a pin protrudes through the cover plate (labeled "A" below). The arm pin has a spring under the cover plate. Reduce the tension on the spring by moving the shutoff arm into the "on" position, down, against the ice maker.
page 1 of 2
|

 |
|